Almost any novice master who has minimal experience with level and hacksaw in wood is able to cope with the installation of an interior door. There are no special skills required. It is quite possible to install the door block in your home yourself. It is only necessary to correctly measure everything before installation, and during the assembly process to ensure that there are no distortions.
Necessary materials and tools
A large set of tools and supplies for installing a wooden interior door is not required. This is not a sewer, electrics or plumbing device in a private house. In the case of the door block, all consumables (anchor bolts, self-tapping screws, carnations, handles and awnings) are already included in the delivery package of the product. In addition, you need only assembly foam.

Installing the doors yourself is not so difficult, but nevertheless this work requires attention and certain skills.
To install the interior door, from the tools you will need:
- hacksaw with a small tooth,
- building level,
- tape measure with a pencil
- screwdriver (screwdriver),
- chisel,
- hammer.
You will also need small thin wooden pieces for struts so that the door does not jam after foaming. Foam in the air expands two to three times. So that the canvas and the jambs during its application do not lead, it will be necessary to first insert wedges in several places at the time of setting and hardening of the adhesive.
Step-by-step instruction
If the installed interior doors exactly fit the existing opening, it is recommended that they be installed at the final stage of the repair of the cottage or apartment. Then, when the ceiling is already whitewashed and the wallpaper is pasted. But if the doorway needs to be expanded, then to do this work is at the stage of rough finishing. Mud and dust when breaking walls forms a lot.

Step-by-step instructions for installing interior doors
Do-it-yourself installation of interior doors is done in six steps:
- Assembly box.
- Installation of loops.
- Canopy door leaf.
- Installation of the threshold and extras.
- Mounting platbands.
- Installation of door accessories (locks and handles).
Box assembly
When studying which pipes are better for water supply and easier to install, you have to consider many metal and plastic options. With door blocks for interiors is much simpler. Almost all of them are made of lumber. Plastic or aluminum structures in private homes are extremely rare. As a result, you only have to work with the installation of interior doors with wood, which is not so difficult.

Types of door frames
There are two ways to assemble a wooden door frame:
- a cut of the corners of the upper crossbar and vertical racks at 45 degrees,
- butt and butt joints without corner cuts.
The first option looks more elegant. However, the second is simpler in independent cutting. Only with it you need to be very careful when cutting the side on the upper crossbar so that the vertical bars stand evenly and without gaps. At the same time, it is recommended to choose the method of assembling the external frame of the interior door, depending on the interior design.

Required dimensions and tolerances for assembling the door frame
To prevent the canvas from sitting too tightly in the box, when trimming the crossbar, 3 mm additionally should be laid left and right. The fastening of horizontal and vertical parts is carried out in the corners from above by screws in the end of the racks outside. And so that when the screws are screwed in, the box bars do not crack, you must first drill into the holes with a thin drill (a millimeter thinner than fasteners).
At the same time, the supporting rack, where the hinges will be, should not be pulled tight to the end at this stage of the installation of the door. It should only be slightly fixed in place.
Hinge installation
The hinges are first hung on the canvas indented from above and from below 200–250 mm. Hinges at interior doors are overhead ("butterflies") and countersunk. The first ones are enough to attach to the end face with the inner small part and fix it with self-tapping screws. And for the second you have to pre-cut the grooves.

Necessary measurements for installation of loops
Next, the canvas is inserted into the box laid on the floor. And the marking of the mounting points of the loops on the racks is made. But first, between the end of the canvas and the details of the box, you need to insert pieces of wood (pieces of fiberboard) with a thickness of 3 mm, so that there are then gaps.
Then, the support strut, which is not completely tightened, is unscrewed from the crossbar and loops are screwed to it. And then it is put in place and finally fixed with screws.
Sealing gaps, holes and installing additional
Between the outer side of the block and the end of the wall it is allowed to leave a gap of 0.5 to 3 cm thick. But if the house is wooden, then this gap should be at least 1.5 cm in case of shrinkage of the log house.

Options for interior doors
The box is fastened with anchor bolts, which are placed under the hinges and the key lock. To do this, first, in vertical posts on both sides, holes are drilled to the wall. Then the block is removed and the interior partition itself is already drilled. If you work with a drill without cleaning the box, there is a serious risk of accidentally damaging its decorative coating.
Also, the box can be fixed with metal suspensions. They are first screwed to the uprights, and then, after bending to the wall, they are attracted to it with self-tapping dowels.
If the wall is thick, then you will need to install additional ones (false slopes, additional timber). The box has a so-called coverage area. This is the interior space and needs to be decorated. Extras are made from solid wood, fiberboard or MDF. After cutting to the required dimensions, you just need to attach them to the box and fasten to it with long screws. Then, along the entire perimeter of the opening, spacer wedges and a spacer in the middle are also placed under them.

Installation Instructions
All that remains is to spray the mounting foam and leave the unit closed for a while at rest. Continuing to install the interior door is recommended the next day. The foamed glue should completely harden and fix the door frame.
Setting the threshold and platbands
The threshold and platbands are installed after fixing the box with anchors and mounting foam. The first is a metal bar with holes under the dowel-screws. It is required to cut off the width of the opening, drill holes in the floor and “nail”.
Platbands for interior doors come in the form of:
They are fastened with the help of a lock connection ("tenon groove"), with nails or with glue. Trimming them in the upper corners of the door is made at 45 or 90 degrees. In this case, the joints of the crossbar and vertical slats should be made as dense as possible. The slightest bumps and errors during sawing will then be visible.

Options for arranging the threshold of interior doors
Installation of accessories for interior doors
At the end of the installation, locking hardware is installed. And usually for interior doors, a mortise product is selected two in one (handle + lock). Such a device can be rotary or push type. But in both cases the principle of work is the same.
Install the mortise handle as follows:
- Marking the canvas at a height of about a meter from the floor.
- A hole is drilled for fittings.
- A handle with pads (sockets) is put and bolted together.
- On the contrary, in the beam of the jamb, a groove is cut under the tongue and a reciprocal metal bar is placed.
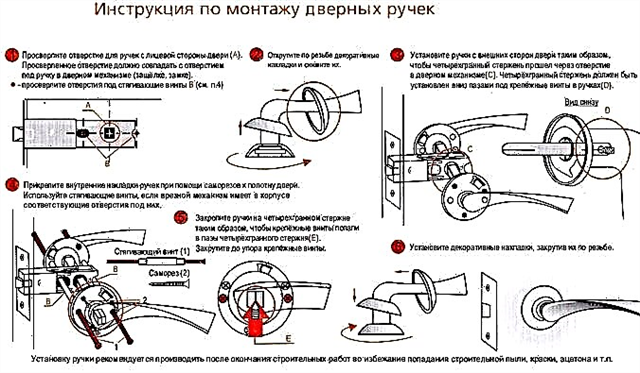
Step-by-step instructions for installing a door arm
Drilling the hole is most correct to do with a crown of the appropriate diameter, so that it turns out even. And the counter on the box and the mounting plate on the canvas should be recessed so as not to interfere with the closing of the door.
Recommendations and Tips
To self-installation of interior doors did not end badly, you should:
- screw all the screws only after drilling thin holes under them, otherwise the beam and the blade can crack,
- install the unit strictly vertically (even if the slopes are curved or go at an angle),
- correctly dispense the mounting foam, a large amount of it can lead to skewing of the block,
- leave a gap of 10-15 mm between the canvas and the threshold to ensure natural ventilation.
Everything should be done carefully and without haste. Marking and cutting of wooden parts must be done only after two or three measurements. To remove an extra centimeter, and even more so to add, will not work here. It is possible to clean and prepare the drainage pump for dirty water for winter in a couple of hours. In order to install the door block according to the rules, it will take at least a day.
On the one hand, you need to carefully measure and prepare the walls, and on the other, do not forget about the time it takes for the foam to harden. The latter not only fills the voids, but also is an element of rigid fixation of the block in the opening, ensuring its resistance to external loads. You should not rush with installation and neglect the rules.

Door placement recommendations
If the opening is too high for the selected door, then you can close the empty space from above with the help of wooden bars and drywall. From above, they will be covered with wallpaper or other wall decor. If everything is done carefully, it will be difficult to distinguish the finish in this place.
Conclusion
The above instructions and tips should help you correctly install the door in your home without errors. To put the door block yourself, you do not need to have special knowledge and skills. It is not a metal-plastic or polypropylene pipe to mount. However, there are nuances in this installation. In this matter, the requirements of building codes should be strictly observed, otherwise the canvas will jam or it will not be able to stand exactly in the frame box.
Materials and Tools
The installation of doors begins with the preparation of the tool. For installation work you will need:
- To level the door, you need a plumb line and level. For measurements, as well as marking, use a tape measure with a pencil.
- The process of assembling and installing interior doors includes the final trim in platbands, and, if necessary, in additions. A hacksaw with small teeth and a miter box are useful for cutting slats.
- A power tool needs a drill with a set of drills for concrete and wood, as well as a screwdriver.
- It is easier to make selections for fittings with a milling cutter, but in the absence of a tool you can get by with a chisel with a hammer.

Of the materials used are self-tapping screws, mounting foam, as well as many wooden wedges of different thicknesses for struts. Immediately you need to decide how to put the interior doors so that the fasteners are not visible.
If preference is given to flush mounting, suspensions are additionally purchased. You can fix the ore with anchors. To drown hats in secret openings, to putty, and to paint over from above.
Two ways to install the box
Open way provides for fixing the interior door box with anchors. The frame is inserted into the opening. Expose vertically and horizontally. All measurements are carried out by level, as well as by a plumb line. Observing a gap of 10 to 40 mm, wooden wedges are driven in between the box and the walls. By tamping or loosening the spacers, they achieve perfect evenness of the frame.

From the inside of the box, increments of 50-60 cm are drilled through holes with countersunk holes. In the wall, holes are drilled on concrete. The anchors are screwed so that the hat disappears inside a secret sampling. After a level check, the gap between the wall and the frame is blown with foam. Secret holes are puttied and then painted over.
Second closed way installation of the box involves the use of suspensions used in the manufacture of the frame for drywall, or a special installation system. The metal strip is screwed to the wrong side of the frame with screws. The box is inserted into the interior opening, wedged with wooden wedges, the suspension petals are bent onto the wall, fixing with screws with plastic dowels.

Installing an extension
When mounting the door unit in a deep interior opening, the frame is not able to close the entire wall. If the width of the box is not enough, then add. Decorative strips are installed on the longitudinal groove of the frame, previously lubricating the lock with glue. If the door frame does not provide a lock for extensions, the strips are fixed through secret holes with self-tapping screws. The optimal fastener pitch is 60 cm.

Door leaf installation
Before installing the door, the canvas is equipped with fittings. On the market there are canopies of different types and colors. The place for their fastening is determined even before the installation of the box. For interior sashes, the installation of butterfly canopies that do not require a tie is popular.

Two hinges are installed on a light sash, stepping back from above and below 25 cm. A heavy canvas is reinforced in the center by a third canopy. With the open method of fixing the box, the anchors are positioned so that they do not interfere with the screws to fasten the hinges. If the installation of interior doors was carried out in a hidden way on suspensions, the problem with the location of the fasteners disappears.
The gap between the end of the sash and the hinge post of the frame should be 6 mm. First mark the place for mounting on the end of the sash. Under the mounting plate of the loop, a recess is selected with a chisel. The canopies are screwed with screws.

The door leaf along with the hinges are inserted into the box. The sash is bursting open with wedges so that gaps form around the perimeter. On the loop stand mark the places for sampling the recesses. The canvas is removed from the frame, a recess is selected with a chisel, then the second halves of the canopies are screwed.
The handle with the lock is installed at a height of 90 cm from the floor. The housing of the locking fittings is applied to the sash at a measured height. Pencil mark the location of the pen, outline the boundaries of the castle. At the end of the canvas with drills or a chisel, a depression is chosen. For the handle, a through hole is drilled. The nest is varnished, a lock is installed, the housing is fixed with self-tapping screws, and then the handles are inserted. On the rack of the box opposite the lock, they make a selection, put the counter plate of the locking hardware.

To install the door with your own hands without defects, the process of hanging the sash is carried out after the hardening of the foam.
Fixing platbands
The final installation of the door unit is the fastening of the platbands. Decorative slats are placed on both sides of the interior opening. Platbands sell wooden, plastic or MDF. The shape is simple flat, with a bevel or curly. Platbands are attached to the end of the interior box with a lock connection, screwed with screws or nailed. The strips can be glued, but the adjacent wall should be perfectly flat, finished with a durable lining.
To perform a simple installation of door trim, first attach a horizontal level bar. The edges are pre-sawed at an angle of 45 °. Vertical slats are installed from the floor. Top mark the cut line at a similar angle. The joint is made as tight as possible. In the case of a gap, putty is used. After solidification, blemishes are painted over.

Platbands can be docked at right angles. The upper bar is wound between vertical elements or laid on top of the end.
Emphasis
The swinging interior sash that opens on the run by the children hits the wall with its handles.The decorative finish deteriorates and even the plaster streams. The installation of a door stop helps prevent the door from opening completely.
The emphasis is a barrel with a rubber nozzle. A limiter is installed after mounting the door unit and all finishing work. The sash is opened to the desired position. The location of the stop is marked on the floor. Drill a hole with an electric drill, drive in the fixing screw and clamp the stop.
How to change the canvas?
Often during the repair only replacement of the door leaf is required. The procedure is much easier than installing an interior door from scratch.
- The old canvas is removed from the hinges. Awnings usually consist of two split halves. To remove the interior sash, it is enough to pry it open with the bottom in the open state. If the hinge pin is inserted on top, the web will not be removed. First, a screwdriver is inserted under the head of the rod, then with a hammer blow it is knocked out of the socket. Dismantling starts from the bottom loop. After removing the rods, the sash can be easily removed.
- Two canvases are compared in size, stacked on top of each other. If the new fold is larger than the old, mark the boundaries with a pencil. Excess areas are cut with a hand circular saw. Slices are adjusted with a planer, processed with a grinder.
- A fitted door leaf is equipped with hinges, a lock, a handle.
- Hinges are in the reverse order.
If a new blade has been customized, the cut points must be masked. Paint and varnish material select close in color or completely repaint the entire canvas.
Dimensions and equipment
By the method of opening the doors are folding, sliding and swinging. The latter are the most popular, because structurally they are the simplest and fairly easy to install. They are presented in a large number of modifications. By the method of opening, the following are distinguished:
- bivalve and single leaf,
- left and right.
The most common sizes of interior doors are 710, 810, 910 and 1010 mm. Bivalves - 1340, 1540 and 1840 mm. The standard height of the doorway is 2055-2060 mm, but in fact it may differ upwards.

Of the basic materials you will need a door leaf, a box and platbands.

Of the accessories - hinges, handle, rotary lock and built-in lock mechanism. If the opening is deep (in the load-bearing wall), then extras may be required.
Consumables and tools
All that is needed for self-installation of an interior door is indicated below:
- hacksaw or saw,
- chisel,
- miter box
- building level,
- Phillips screwdriver or screwdriver,
- roulette of at least 3 m,
- polyurethane foam,
- hammer,
- dowels and screws,
- pencil,
- sealing tape
- spirit level - short (50 cm) and long (180 cm),
- universal screws
- knife,
- elbow
- wedges - wooden or plastic,
- nails are finishing.
Step-by-step installation of interior doors
How to install a single-leaf interior door so that it stands evenly and easily closes? The procedure is as follows:
- To dismantle the old door and prepare the opening.
- Assemble the door frame. The components must be laid out in the proper order, taking into account the direction in which the web will open.
- The upper bar of the box to connect with the ends of its two racks. You can use nails or screws.
- Install awnings.
- Install the box. The frame, which was assembled earlier, is placed in the opening, and then put up in a vertical and horizontal position using wedges.
- Hang a door. The hinge rack of the box must be fixed to the wall with screws, and then hang the canvas on the hinges.
- Secure the second post to the wall with screws. Then, on the sash, you need to check the gaps between the box and the edge of the canvas to prevent the formation of cracks. In a situation where a threshold is provided, it must be attached to the floor surface. Then foam mounting slots between the box and the edges of the opening.
- Insert the handle, lock and install platbands. Now we will analyze the technology of work taking into account the requirements of GOST and SNiP step by step.
Step 1: Assembling the door frame
A door frame is a frame made up of beams. Installation boxes can be made in a U-shaped or rectangular shape. The latter case is applicable when installing doors in the bathroom or toilet. The U-shaped form is usually used in all other cases when there is no threshold.
Cutting and connection methods
Manufacturers most often produce ready-made pieces for a box beam, which must be connected with each other with screws. If you plan independent work, then the best solution is to assemble the box according to the door leaf. To do this, the door is laid on a flat floor, after which the box parts are cut during the subsequent layout.
There are two ways to connect the details of the box:
- Washed down the lintels and racks at an angle of 45 °. For those who did not have much experience in carpentry, this method will be difficult to use. The parts themselves are connected using self-tapping screws. For them, you need to make holes perpendicular to the cut. Holes must be made in advance so as not to spoil the workpiece.
- He washed down at a right angle. To do this, it will be enough to use a hacksaw with small teeth. To determine the size of the bar vertically, you need to take the height of the canvas and add 3 mm to it to the bottom and top, provided that a threshold is planned in the doorway. If it is not there, you need to leave about 1 cm from the bottom. The ceiling will be fastened with two screws to a vertical stand.

It is important to remember - the second method is the only possible one in case of sawing a bar for the threshold.
It is very important during installation to check all the gaps between the box and the canvas - there should be 3 mm on all sides. If a U-shaped box is installed, it is necessary to maintain a gap of 1 cm between the floor surface and the door edge from the bottom.
Connection box elements
All racks prepared in advance, as well as the upper crossbar, should eventually be combined and pulled together with 6 cm long self-tapping screws. At least 3 self-tapping screws should be used for one joint.

To achieve a normal connection density from one of the elements of the box, you need to remove part of the quarter using a chisel or a hacksaw. The length of the part to be removed should approximately equal the thickness of the bar that is adjacent to the part.

Doing a Quarter Flush


Completed connection at 45 degrees
If the door size is much smaller than the opening, then installation should be carried out according to the following scheme with a lintel over the entire width of the opening.

Step 3: Installing the box and hanging the web
The box must be installed in a pre-prepared opening. The stand with the hinges must be aligned first with a plumb line or level. It is necessary to check it from all sides. Then the upper crossbar and the rack must be opened with wedges. The stand will be exposed only when it takes upright position.
Next, wedge the second rack. Be sure to check the horizontal part of the box.
The old way - side racks should be drilled through. To do this, holes for dowels are initially made in the wall. The box must be attached to the wall with self-tapping screws with a length of at least 150 mm.

Old way fasteners
In order to fix the box in the opening in a hidden way, you can use metal plates, which are usually used to install drywall structures. Most often, such plates are used together with anchors. In this case, it is worth choosing the number of fasteners in accordance with the expected load.


It looks like a mount
The use of such plates is a non-standard method and is possible only in the absence of a fine finish. It is recommended to grind a section of the wall in order to subsequently putty the fasteners.
It remains to hang the door on the frame. After that, you need to carry out the final adjustment of the box. Then the rack for the castle should be fitted under the door so that it does not protrude beyond the wall. It is worth remembering that to preserve the integrity of the box and the blade, you must first drill several holes for the screws.
Step 4: Foaming
After fixing the canvas, you need to foam the slots between the box and the edges of the opening. Foam should be fed gently, in layers, with the feed being made from above so that it does not protrude outward. Then the door will have to be closed and for a certain time not to touch it, so that the foam dries. The approximate drying time is 1 day.

If the composition accidentally gets on the canvas, immediately remove it with a clean, dry cloth, dried fragments are cleaned using effective methods of removing the mounting foam from the doors.
Step 5: Installing the lock and handles in the door leaf
The most popular today are handles with a built-in lock. The procedure is as follows:
- Mark a meter from the floor. The handle mechanism must be applied so that a mark is visible from above in the hole.
- Drill holes in the blade from the end. After that, the edges of the holes should be cut off with a chisel to even the hole.
- Insert the mechanism into the hole. In this case, the lock must be aligned, and then fixed with self-tapping screws. The strap on the lock should be encircled with a pencil for cutting veneer, then the mechanism should be removed. According to the intended contour, you need to select a site for determining the thickness of the keyhole. This is done using a chisel.
- Drill holes for latches and handles. It is necessary to attach the lock to the canvas from different sides, align it and mark it. The holes should be made on both sides and at the same time they should not be through.
- Remove the resulting chips and install the handles.
It is important to remember that you should not use the screws that come with the handle in the kit. They are made of non-solid metal, as a result of which they quickly fail. It is worth using high-quality red-hot self-tapping screws. Read detailed step-by-step instructions for installing the lock and handle on the interior door.
Step 6: Installing Trims
An extension is a strip about 2 meters long, 250 mm wide, and no more than 3 cm thick. The strip should be used during the installation of interior doors if the wall is thicker than the door frame.
The beam for the box is made in a standard width of about 70 mm. It can be expanded according to the thickness of the opening by adding. This will more clearly combine the box and the walls. On a bar there is a groove for a level. First you need to measure the distance to the edge of the wall, starting from the depth of the groove.

The add-on can be installed in various ways:
- in the groove in the box
- with groove cutting in the absence of finished,
- attaching the extension from the inside of the beam in the absence of a groove, the box is installed with the extension,
- fastening of a good in the form of "P",
- if the extension is not too wide and there is no groove in the box, the bar should be drilled and screwed to the box.

The plank is sawn into several parts with a circular to get several add-ons of the required dimensions. You need to cook one short bar and two vertical ones. Read our simple step-by-step installation instructions for installing an interior door.
Step 7: Fixing the platbands
During installation of platbands, the box should be located at a level with an opening on the front side. To connect the platbands, you must first attach the vertical bar to the box and put a mark higher by 0.5 cm, stepping back from the crossbar of the box. This mark will act as the edge for the slice. In the same way, you need to mark the slice on the other side.

Korovin Sergey Dmitrievich
Master of Architecture, graduated from Samara State University of Architecture and Civil Engineering. 11 years of experience in design and construction.
Connection Methods
There are at least two options for how to connect these bars together:
- Below 45 °. The option is the most correct from the point of view of aesthetics, but the most difficult to perform. High precision cuts are needed - so there are no gaps. With dexterity, you can also saw off using a carpenter's miter, but you need to do it carefully. The second point - if you saw a laminated material with a hacksaw, chips remain on it. The way out is to use a well-ground tool.
One way to connect a door frame
- Fit butt, at 90 °. This method is simpler - there is less room for error, but it is necessary to remove part of the protrusion at the junction of the uprights and lintels. To do this, we put a segment for a lintel cut off with a solid margin to the corner. We trace with a pencil the part that interferes with the connection. Using the chisel, remove excess. Having tried on a couple of times, we connect, we set the angle exactly, we monitor the coincidence of the relief. In this position, we drill holes for screws. The diameter of the drill is 1-2 mm less than the diameter of the fastener. Then we connect this node, constantly monitoring 90 ° and the accuracy of the relief.
How to connect a door frame


Regardless of which way you are going to connect the elements of the door frame, the first thing they do is wash down the racks and lintels on one side. Then they are put in a box on the floor, checking the connection. Next, you need to determine the height of the side parts of the door frame.
Determine the size
When folded, the required length is measured on the inside of the rack. The racks do not always make the same - the floor is often uneven and this must be taken into account. To do this, take the level and check how flat the floor is. If it is perfectly flat, the racks will be the same. If there is a deviation, it must be taken into account: make one of the racks longer. Usually this is a few millimeters, but this is enough to warp the door.
When calculating the height, note that the racks should be 1-2 cm longer than the door leaf (taking into account the cuts). A gap of 1 cm is made under the door, if it is not intended to lay a mat under. If there is a rug / carpet / carpet, it is better to do more. Do not be afraid to leave gaps. They are necessary for normal ventilation in the room. Please note again - the height is measured on the inside of the door frame - from the bottom edge to the saw cut. Having cut off, try on racks in a doorway.
Clearance when installing interior doors 
Now it is necessary to saw off the lintel along the length and, if necessary, saw it on the other side (if the joint is at 45 °). The length of the lintel should be such that when folded, the distance between the uprights is greater than the width of the door leaf. The minimum clearance is 7 mm, but often do more. 7-8 mm are distributed as follows: 2 mm - on loops, and 2.5-3 mm on compensation clearances. Any interior doors - MDF, fiberboard, wood - depending on humidity change their dimensions. To take into account these changes and gaps are required. And 5-6 mm - this is not always enough, especially in wet rooms. For a bath, leave a little more for sure, otherwise they may be difficult to open when humidity is high.
So, we decided on the minimum gaps when installing interior doors:
- on loops - 5-6 mm,
- at the top, bottom and sides - 3 mm,
- bottom - 1-2 cm.
After you cut off all the parts and made the cuts, fold the box on the floor. If you notice flaws in the docking somewhere, fix it with sandpaper attached to the bar. The more accurate the match, the smaller the gap.
Buttonhole
Most often, 2 hinges are installed on the interior doors, but 3 can also be installed. They are placed stepping back 200-250 mm from the edge of the door leaf. If the box and door leaf are made of wood, choose a place so that there are no knots. First fasten the hinges to the door leaf. The procedure is as follows:
- We apply loops to the selected places, outline the contours.The easiest way to do this is with a finely honed pencil, but experts advise - with a knife blade. This is more accurate and smaller gaps remain.
- If there is a milling cutter, they work, if not, they take a chisel and select the material for the thickness of the loop. You do not need to do more sampling, only by the thickness of the metal.
- A loop is installed in the prepared recess. Its plane should be flush with the surface of the canvas.
- The exposed loop is fixed with self-tapping screws.
Having fixed two hinges, they put the door leaf into the assembled box, set the correct gaps: from the hinge side - 5-6 mm, 3 mm from the opposite side and from above. Having exposed these gaps, the canvas is fixed with wedges. Expose exactly in the horizontal and vertical plane (you can use the pads, if necessary).
After exposure mark out the location of the mating parts of the loops. Sometimes it’s more convenient to remove the already installed loop, and then install it in place. By marking, they also make a notch. Depth - so that the hinge surface is flush with the surface of the door frame.
The door hinge is described in detail in the video.
Door frame installation
The assembled box must be correctly inserted into the opening. This is a very responsible task. Before you install the interior door, knock down everything that can fall off in the opening. If the wall is too loose, the surface is treated with a deep penetration primer with an astringent effect. If there are too large holes, they are covered with plaster, very large protrusions are squeezed. In the prepared opening, it is easier to insert the interior door. If this is your first time doing it yourself, make your work easier.
Exposed box without door leaf. It is oriented strictly vertically. Verticality is checked not only by the level, but also by a plumb line. The level often gives an error, therefore it is more reliable to check with a plumb line.
Check the inserted interior door using a plumb line. 
To prevent the box from distorting during installation, yet on the floor, install temporary struts, in the corners - cutswhich give a high degree of rigidity. In order for the doors to open, they are inserted in the same plane with the wall. Only in this way will it open completely. If the wall is uneven, put the box not on the wall, but vertically. Otherwise, there will be problems opening or closing the door.
How to insert an interior door with your own hands - in the same plane with the wall 
After the position is selected, you can fix. They do this with the help of mounting wedges - triangular wooden or plastic bars. First, wedges are placed on both sides of the lintel - the cross-member, then above the uprights. Thus, the position of the box relative to the doorway is selected and fixed. Next, the verticality of the racks is checked again. They are checked in two planes - so that they are not inclined forward or backward.
How to put an interior door with your own hands: wedge the box 
Then set the wedges below, then after about 50-60 cm, checking that the racks are exactly standing level. The cross bar is also wedged in the middle. Check if the box elements are bent somewhere, if necessary, correct. You can begin to mount.
Fastening the box to the doorway
There are also two mounting methods: right through to the wall and mounting plates. If the wall allows, and you are not afraid of the fastener caps in the box, you can attach it through and through. It is reliable.
To install the interior doors, it is enough to screw two screws into the cutouts under the hinges and, on the other hand, under the plate of the counterpart of the lock. Additional holes are drilled in the cut-out recesses. They are made so as not to get into the holes for attaching loops or mates. Make sure that the head of the screws is recessed and does not interfere with the installation of hinges and pads.
Installation of interior doors according to this scheme is shown in the video. There are several interesting nuances about setting the door frame.
If such a quantity of fasteners seems unreliable, they drill through, and cover the holes with decorative washers matched to the tone. Or there is also a special MDF molding with removable trims. Fasteners are installed in the prepared groove, and then closed with a bar.
Special boxes for interior doors made of MDF 
The second method - secret, fasteners while not visible. First, mounting plates are attached to the back of the box. In principle, it can be used for drywall, but there are special ones that are thicker, although when installing interior doors, drywall is enough.