Often, developers have a question how to plaster aerated concrete from the outside. Before starting work, it is recommended to determine the important characteristics and, based on this, choose the best finish.
Aerated concrete plaster must meet the basic requirements - the mixture is tight to the surface and has good adhesion. The finishing layer is durable, frost-resistant while having the right level of vapor permeability and water repellent.
When to do plastering work
Exterior plastering is recommended after finishing work in the building. It is generally accepted that if you do not protect the surface of gas blocks from the street, it will absorb moisture. This is not so, primed walls can stand without a protective layer for the whole winter, when the climate changes in spring, moisture from the surface will evaporate. In the opposite case, when the house is processed from the facade, evaporation vapors will be directed inside the room, which will lead to the appearance of dampness.

Note! An exception is the option of building a house on the seashore or pond. When it is required to protect the external walls from the influence of humid climate and winds.
Before plastering, the walls of the gas blocks should dry well. If during the construction process a cement mortar was used, which has the ability to absorb moisture. For this reason, exterior decoration during the rainy season will not be effective. But especially dangerous for the walls is cold water, which then turns into ice. In the process of melting, the structure of aerated concrete begins to collapse.
Facade insulation
If the building is properly insulated, then you can quickly heat the room and save money on heating costs. Insulation from the outside is recommended to be done with mineral wool, polystyrene foam, polystyrene foam or other options. For example, insulation and plastering the facade of a house can be replaced by building an additional brick wall or treated with liquid polyurethane foam.
Types of plasters
There are several types of plaster that are suitable for processing aerated concrete walls. There are certain requirements for the composition of the mixture for outdoor work.
- The material must be permeable and at the same time its coefficient should be higher than that of the treated surface - aerated concrete or sealant.
- The plaster must be resistant to frost and temperature changes.
- To prevent cracking, the applied layer must be elastic.
- Plaster should have strong bonded qualities with aerated concrete.
Mineral
How to plaster aerated concrete walls? Professionals and private builders recommend the use of mineral-based plasters. They are among the thin-layer compositions specially created for aerated concrete finishing. Such solutions are made with their own hands, they have an affordable cost, good vapor permeability and low weight.
The finished compounds include such components:
- lime,
- white cement
- marble chips and other fillers.
The color palette of such plaster mixes is limited. They can be easily painted; the only caveat is the use of vapor-permeable coloring compounds. Painting is able to protect the coating from moisture, because a humid environment can destroy mineral plasters.
Silicate
The basis of this type of building plaster is potassium water glass, which is a binder component.
Advantages of the silicate mixture:
- Ease of application
- Resistance to moisture
- Vapor permeability,
- If necessary, painted in any color,
- Acceptable price,
- Long service life (up to 25 years),
- Decorative qualities.
Silicone
Plastering aerated concrete blocks is better with silicone facade plaster. It has high technical and operational characteristics, surpasses other plaster mixes.
The advantages of silicone plasters include:
- water repellent
- building material is easily applied by hand, without the involvement of specialists,
- plaster has a high degree of resistance to atmospheric phenomena and vapor permeability,
- Long life
- Fillers have a different texture,
- The material is elastic.
Acrylic
The material has high decorative qualities and durability. A big disadvantage of acrylic plaster for processing aerated concrete and other cellular textures is the low level of vapor permeability. For this reason, condensation forms in the inner layer of the plastered surface. As a result, under such an impact, surface deformation occurs - peeling and cracking.

Cement-sand
Cement plaster is not suitable for processing external aerated concrete surfaces. For what reasons, this popular building material is not suitable:
- The solution is not fixed on a smooth surface of aerated concrete due to insufficient adhesion properties. The mixture has a high density and high weight,
- When applying a cement mortar to the surface, aerated concrete absorbs moisture, weakening adhesion of materials. As a result of such rapid drying, the integrity of the layer is destroyed,
- Low vapor permeability of cement mixtures - inconsistency with building standards, and violation of optimal microclimatic indicators in residential premises.
If cement plaster is used for internal work, it will protect aerated concrete walls from the penetration of steam.

Important! Expanded polystyrene and polystyrene are not recommended for use on surface treatment of aerated concrete.
Gypsum
Plaster, which includes gypsum, has the following positive qualities:
- dries quickly
- the solution does not shrink,
- the mixture goes smoothly
- no topcoat required.
Cons of stucco walls with gypsum:
- average vapor permeability,
- more water is required compared to special mixtures, about 10-15 liters per 1 bag of 25 kg,
- the surface will quickly get wet after rain and snow,
- spots appear on the surface that need to be painted over.

Front
The mixture is most effective for processing both external walls and indoors, the material is easy to apply with your own hands. Plaster has a number of positive qualities - good adhesion to the base, attractive appearance. In particular, the material has vapor permeability indices identical to those of gas blocks. When choosing plaster for the construction of aerated concrete, it is better to choose a quality special mixture, this will simplify the process of decorating the house.
If there is a choice of plaster or drywall, which is better for aerated concrete inside the house. The following facts should be taken into account: walls made of gas blocks are smooth, and they do not require alignment. Accordingly, the plaster will be cheaper, the solution will lie in an even and beautiful layer.
Do it yourself
We plaster aerated concrete on the outside with plaster intended for outdoor use. There are two options for applying the mixture - a thick layer or several thin layers, which are applied no more than 3 layers and not more than 1 cm each.
- the surface is prepared for plastering - pollution is removed,
- then you should do the hanging of the surface with your own hands along the lighthouses
- spray is applied - the first layer of plaster coat,
- primer is applied and leveled,
- cutting corners
- slope finishing
- a coating layer is applied
- the surface is overwritten.
Technology work outside
- If necessary, a heater for blocks for plaster is mounted.
- Wall preparation - surface leveling to reduce material consumption and application thickness.
- Before you start plastering the walls, aerated concrete should be treated with a primer. For this, compositions intended for the fine-mesh structure of materials are used.
- Application of a thin layer of plaster mix for aerated concrete surfaces - up to 5 mm. This base will serve to attach the mesh.
- Reinforcing plaster mesh.
Tips
It should immediately be noted that it is unacceptable to plaster aerated concrete blocks from the outside with adhesive solutions. Because the glue does not fulfill the tasks. In order to protect and level the surfaces, it is recommended to use specially designed mixtures that meet all operational requirements.
When work is done on plastering the facade of aerated concrete, it is recommended to follow some rules, which are described below.
- after the building is erected, it is necessary to withstand a certain period of time so that the internal moisture evaporates naturally,
- the type of plaster must be suitable for outdoor use,
- sequence of repair work - first inside the house, after outside,
- the temperature regime must correspond to +8 to +30 С0 - for outdoor decoration,
- Building regulations, the observance of which should be taken into account in relation to increasing thermal conductivity. Each mounted or applied material to the gas block should be considered.
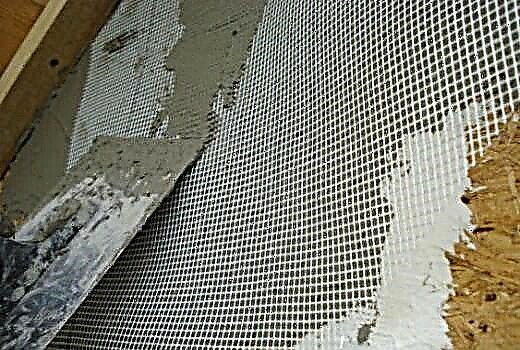
Reinforcement
To the question whether it is necessary to reinforce the plaster, and whether a mesh is needed. The answer is simple, since the layer of plaster coating of aerated concrete can vary from 5 to 15 mm. If the layer exceeds 10 mm, a metal mesh with a fine texture of the cells is used as the reinforcing layer. For example, a mesh with a wire diameter of 0.1 mm and a mesh size of 0.16 x 0.16 mm, or fiberglass mesh with 5x5 cm cells, is suitable.
You need to mount the grid with an overlap of 5 cm, for the corners of the house use perforated corners with a grid. This method will help prevent cracking on the plaster after the building shrinks. It is better to install the mesh in the applied solution with a spatula. A particularly important point is the installation of the grid in places with a high level of voltage - the area of windows and doors.
Advice! If you attach the net to a dry surface, the result will be zero. Because the mesh needs to be fixed to the wall using self-tapping screws, and then apply a layer of mortar. Otherwise, the non-fixed mesh will move along with the putty.

- Align the plaster layer with the mesh using vapor permeable plaster.
- It is necessary to wait until the first layer is completely dry. Otherwise, it will fall away under the weight of the next layer. This technique provides for a thin layer application of the mixture. It will take three to four days to wait for complete drying. Accordingly, the thicker the layer, the more wait for it to dry. Checking whether the surface has dried is carried out using water. Splashing liquid onto the surface, it quickly absorbed - which means that it is time to begin further work.
- A second layer of plaster is applied, which is considered to be leveling. Therefore, the layer should be even and smooth,
- A third finishing coat of plaster is applied and, if necessary, it will require subsequent grouting.
- Surface painting, materials for outdoor use or plastering.
- Water repellent treatment. Experts recommend applying this solution 12 months after staining and completing all work on the facade cladding. Water repellent gives any coating additional water repellent properties.
Note! When the plaster layer dries, it must be protected from the influence of such undesirable environmental factors as moisture, snow, rain.
Putty
When deciding whether it is necessary to putty aerated concrete, it is recommended to learn about the types of building mixtures. There are 3 types of varieties of products on the market that are designed for finishing. By and large, this is facade plaster intended for thin-layer finishing of an already plastered surface, differing only in composition. Ready mixes are sold in buckets and come in silicate, silicone and acrylic.
Important! Performing work on plastering the house from the outside, it is recommended to use only steam-passing building materials. This will provide not only a reliable finish, but will serve as a decoration for the building.
Is it possible to plaster aerated concrete with cement mortar?
No you can not. Regardless, the gas blocks were laid on cement or glue. In general, it is extremely undesirable to plaster aerated concrete with cement mortar, because aerated concrete is very smooth and the solution does not hold on it, and also strongly absorbs water from the solution.
Reasons why it is impossible to plaster a house from aerated concrete with cement mortar:
- Cement mortar has a lower vapor permeability than a gas block. This is the most important reason why you should not use it. In the case of wall decoration from aerated concrete, professionals have a rule, it is possible to use only that finishing material which, in terms of vapor permeability, does not differ from aerated concrete itself or has a larger indicator compared to it. Only in this case, the optimum microclimate of the aerated concrete house will be maintained.
- Cement-sand mortar has a high moisture content. To knead the components in the sand-cement mixture, you need to add water. It is also obvious that aerated concrete, having a significant indicator of moisture absorption, will tend to absorb this water from the solution. This, in turn, reduces the quality of the applied solution and its ability to stay on the wall. After all, concrete gains strength only if it is uniformly and slowly drying.
Remember, the foundation must be periodically moistened and covered with a film to ensure uniform drying. So why on the wall should he behave differently? The primer saves the situation, but not by much. The appearance of a web of small cracks on the plastered surface of aerated concrete cannot be avoided.
- Plaster cement mortar has low adhesion. It cannot provide high-quality adhesion to aerated concrete. One of the reasons can be considered the weight of the solution and the presence of large impurities in its composition.
It is possible to increase the adhesion rate (adhesion, adhesion of surfaces) by adding lime to the classic cement mortar recipe (proportion: 8-10 kg of lime per 100 kg of concrete).
Cement-lime plaster can be purchased in the form of a finished dry mixture. For example, the dry building cement-lime mixture KREPS Extra Light (240 rub / 25 kg), Founders Startwell T-21 (208 rub / 25 kg), Baumit HandPutz 0.6 (300 rub / 25 kg).
Plaster composition KREPS Extra-light
Facade plaster Founders Startwell T-21
Facade plaster Baumit HandPutz 0,6
- obligatory application of the finish layer. Because it is difficult to make a smooth surface using a sand-cement mixture.
Is it possible to plaster aerated concrete with glue for aerated concrete?
Also undesirable. Despite the fact that the adhesive mixture was developed taking into account the specifics of aerated concrete, it is intended for applying a thin layer and forming seams, and not for exterior wall decoration.
Violation of vapor permeability of aerated concrete will lead to problems such as cracking of the finish layer, the appearance of traces of seams (disappear after drying), the appearance of mold.
What plaster is better to plaster aerated concrete walls?
The market offers a variety of ready-made mixtures for plastering walls of aerated concrete. To make the right choice, you should pay attention to the characteristics of the plaster:
- vapor permeability
- the necessary amount of water for mixing the mixture (not more than 0.2 liters per 1 kg of mixture),
- boundary values of the thickness of the plaster (minimum and maximum),
- adhesion with the base (minimum 0.5 MPa),
- resistance to low temperatures,
- crack resistance
- solution viability time. The more, the easier it is for beginners to work with it.
Plaster for aerated concrete Ceresit CT 24 And only choosing between two equivalent mixtures, you should be guided by the price, it solves not the last role, but not the key one in this matter.
According to reviews, stucco walls made of aerated concrete outside the building are popular among users - a dry mix with Ceresit CT 24 plasticizers (380 rub / 25 kg), price / quality is the leader in terms of quality.
Material prepared for the site www.moydomik.net
When can walls from aerated concrete be plastered?
Since aerated concrete easily absorbs moisture, it is better to protect it immediately from getting wet. We repeat, it is not critical if the material gets wet, but do not allow moisture to freeze in the gas block. This can lead to its weakening and the appearance of unwanted cracks.
Haste in the lining is also useless. After laying aerated concrete, the walls should dry well. That is why wall plastering of aerated concrete is carried out only in the warm season. In the case of using concrete-sand mortar as a bonding element when laying aerated concrete blocks, the drying time increases, since such a seam is several times thicker than a seam made with a special adhesive mixture.
Primer for aerated concrete Ceresit ST-17 If it is not possible to finish the house during the warm season, you need to cover the walls with any deep penetration primer. For example, Ceresite ST-17 (549 rubles / 10 l).
The primer will reduce water absorption. It is also advisable to cover the walls with polyethylene remaining from the packaging of pallets with aerated concrete.
According to the masters, the most preferred time for finishing work is the period when the night temperature exceeds 0 ° C. For central Russia, this time is from late March to early October.
1. Foundation preparation
It starts with the alignment of the walls - removing bumps is done using a plane or grater for aerated concrete. This work is recommended to be performed at the stage of building a house, but many neglect this, saving time. In principle, this step can be omitted, which will lead to a significant increase in the consumption of the mixture and an increase in the thickness of the coating layer. In turn, this is fraught with peeling of plaster and cracks.
2. Primer application
Often there are recommendations that you should dilute the primer with water 1 to 1. This is fundamentally wrong, because reduces its ability to increase surface adhesion. There are more reliable ways to save. For example, remove dust from a surface by applying clean water to it. Water is applied with a brush or roller as if it were a primer. And then, after drying, a primer is applied.
The choice of primer depends on the purpose of the room to be finished. For the corridor or hallway, any universal primer is suitable, for example, Unis (250 rubles / 5l). For the bathroom and kitchen, it is advisable to use a deep penetration primer, for example, Prospectors (450 rubles / 10 l).
 Application of primer on aerated concrete with a brush
  Application of primer on aerated concrete using a roller
3. Installation of beacons
Lighthouses, as the name implies, determine the thickness of the solution. They are set to the width of the rule. The accuracy of the installation is determined by the construction level.
 Installation of beacons for aerated concrete plaster
 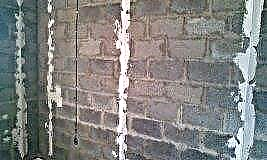 Lighthouses for aerated concrete plaster
4. Throwing a "fur coat"
This is the name of the method of applying the first layer of plaster. Work is carried out from the bottom up. Next, you need to lean the rule on the beacons and align (stretch) the sketched layer on them. If voids appear, they must be repaired immediately. The main thing is that the plaster does not peel from the base. If this happens, you need to remove the plaster, treat the surface with a primer and apply the solution again.
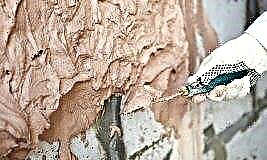 Plastering
 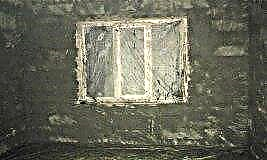 Plastering - a fur coat
5. Processing the first layer
After the first layer of plaster dries, it needs to be slightly moistened (with a spray gun) and leveled. Since the lighthouses serve as cold bridges, it is advisable to remove them at this stage, and fix the places (recesses after dismantling) with a solution.
 Pulling plaster over beacons
  Dismantling plaster beacons
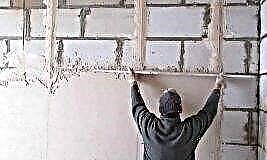
6. Angle formation
To arrange and strengthen the outer corners, a perforated corner with a mesh is used.
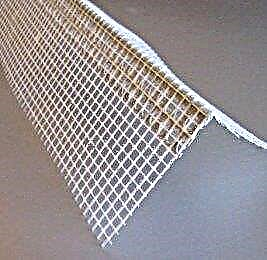 Grid for plastering corners
  Mounting pattern for plastering corners
7. Finishing
Grouting (if necessary) and painting walls of aerated concrete. In the case of wallpapering, no finishing is required.
 Plaster grouting technology
  Finish grouting plaster
An example is ESKARO AKZENT (antibacterial paint, 325 rub / 0.9 kg). In this case, for rooms with high humidity, you should use special paints, for example, AquaNova Premium (282 rubles / 2.8 kg)
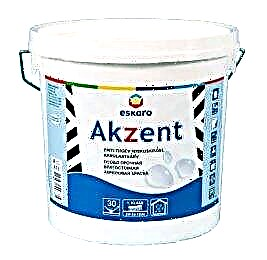 ESKARO AKZENT paint
  AquaNova Premium Paint
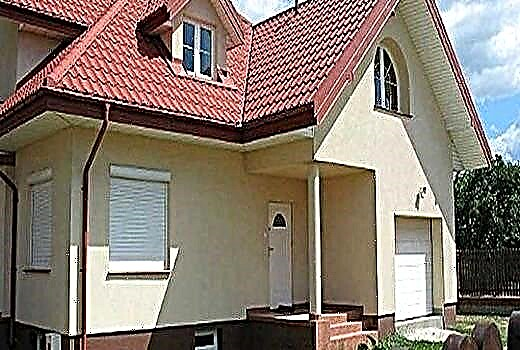
Exterior wall plaster of aerated concrete
Decorative plaster of the facade of the house may include applying plaster for outdoor work with a thick layer (thick-layer finish) or several layers (thin-layer plaster).
Consider a multi-layer version of applying a thin-layer facade plaster for aerated concrete. Its feature is the creation of three thin (no more than 10 mm) layers.
The technology of applying plaster on the outside:
- wall preparation. Includes surface leveling to reduce the consumption of the mixture and the thickness of its application,
- surface priming
- applying a thin layer of plaster mix (up to 5 mm). Its purpose is to serve as the basis for attaching the mesh,
- reinforcing plaster mesh
How to reinforce plaster
As the reinforcing layer, a metal mesh with small mesh can be used, for example, a steel mesh with a wire diameter of 0.1 mm and a mesh pitch of 0.16x0.16 mm (average price 950 rubles / sq.m = 2 850 rubles / a roll) or a fiberglass mesh (for example, a reinforcing fiberglass mesh with a cell pitch of 50x50 mm (approximate price of 17.60 rubles / sq.m = 880 rubles / roll).
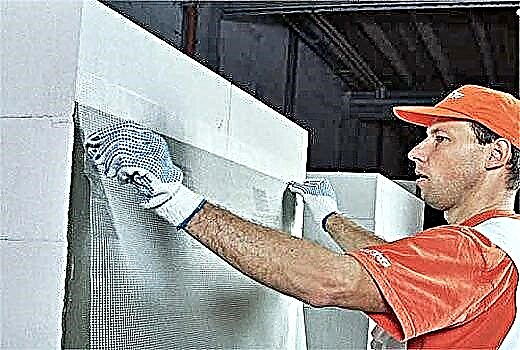
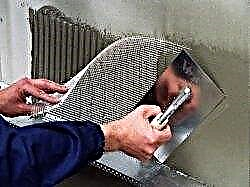 Plaster reinforcement with mesh. A mesh with an overlap of 50 mm is attached. At the same stage, the corners of the building are formed using a perforated corner with a mesh. The mesh helps prevent cracks in the plaster due to shrinkage of the building. Thus, the facade plaster of aerated concrete is not covered by a web of small cracks. The mesh is recessed into the applied solution with a spatula. It is especially important to install the grid in places of high voltage, near windows and doors.
- alignment of the plaster layer on the grid,
Next, you need to wait until the first layer has dried completely. Otherwise, it may fall under the weight of the second layer. Since this method provides a thin-layer application of the solution, you will need to wait 3-4 days. The thicker the layer, the larger. You can check if the layer has dried with water. If you splash onto the wall and the water is absorbed, then it's time to get to work.
- applying a second layer of plaster. This layer is considered leveling, so increased attention is paid to the evenness of the application and the formation of a smooth surface,
- applying the third (finishing) layer of the stucco mixture with subsequent grouting, if necessary,
- painting a plastered wall of aerated concrete or applying a textured plaster mixture, for example, Pobedit-Bark beetle (340 rubles / 25 kg).
For painting aerated concrete, only exterior paints are used. For example, Nova Fasad (590 rubles / 7 kg), Gasbetonbeschichtung from Dufa (2674 rubles / 25 kg), ROLPLAST Gordianus (3700 rubles / 10 kg), Dyotex (concentrate, 5500 rubles / 15 kg).
- water repellent application. This is a special solution that professionals recommend applying a year after staining, after finishing all facing work. Water repellent will give any surface additional water repellent properties. Well-proven special water repellent for aerated concrete "Neogard" (350 rubles / 1 l).
Conclusion
Consistently performing work on plastering walls of aerated concrete and using only steam-transmitting materials, it is possible to ensure a reliable finish that will adorn the facade of the house for more than one year. A scheduled repair work will be reduced to periodic staining, to restore the color of the paint and eliminate small cracks.
Features of aerated concrete walls
Before plunging headlong into the issue of finishing walls, you first need to understand the structure of gas blocks, from which the quality of the future home will completely depend.
The main way to obtain this cellular material is the introduction of special additives into the composition of the concrete mortar, which, when reacted, form air bubbles that tend to break out. They simply dot the aerated concrete body not only with voids, but also with thin channels, forming a surface resembling natural pumice in its texture. Such a structure has excellent positive properties with proper final processing of blocks:
- high sound absorption coefficient,
- good level of thermal insulation,
- “Breathing” walls create a unique indoor microclimate that preserves warmth in the winter season and cool even in the most intense heat,
- the porous structure of aerated concrete is not subject to the emergence and maintenance of colonies of fungal and other microorganisms, which as a result of their vital activity destroy walls.
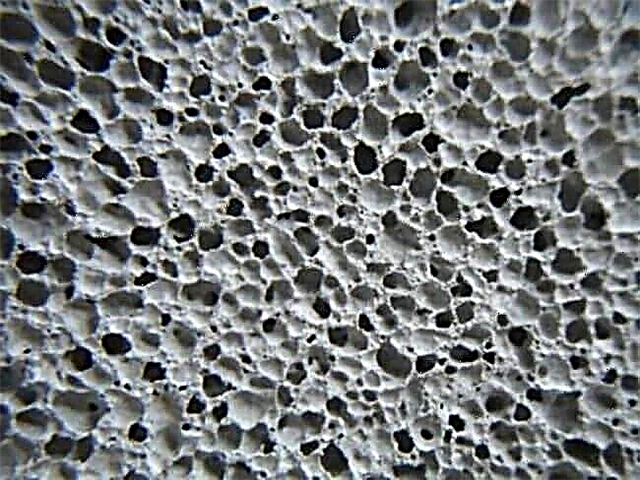 Porous aerated concrete structure
But despite these wonderful operational characteristics, aerated concrete has disadvantages due to its structure:
- the porous structure is subject to increased water absorption, which is fraught with rapid destruction of blocks,
- products with the highest density and, accordingly, strength, do not differ in resistance to mechanical stress, leading to spalling and cracking,
- the heterogeneous structure that retains heat so well is very sensitive to wind. Unprotected bare aerated concrete walls are heavily blown, and it’s cold inside them, despite a well-organized heating system.
Taking into account all these negative circumstances, we can conclude that aerated concrete walls need to be finished. But it needs to be done as competently as possible so as not to disrupt the microcirculation inside the walls, which can lead to destructive processes.
Vapor permeability
The porous structure, which has been talked about so much, has another property - good vapor permeability, which is the key to the durability of any structure made of cellular concrete.
In the process of life, people release a large amount of all kinds of moisture into the atmosphere. Just imagine how the air is saturated with it when ironing, washing, drying clothes, cooking or taking a bath. Of course, part of the vapor generated is removed using artificial and natural ventilation, but the bulk falls on the walls. In its pure form without finishing, aerated concrete perfectly passes moisture without retaining it inside your body.
Another thing is if there is a front and inner lining, and it is mandatory for such a wall material. Therefore, both finishes should complement each other, maximally organizing the natural conclusion of humidity.
For example, a ventilated facade system was chosen as the exterior finish. In this case, the provided ventilation gap does not violate the natural moisture balance in the aerated concrete wall, leaving complete freedom for couples to go outside. In such circumstances, you can use any plaster for aerated concrete.
 Ventilated facade - the best type of exterior decoration for aerated concrete walls
In the case of wall insulation devices, you need to pay attention to the characteristics of the base material. For example, mineral wool fully complies with the requirements - it qualitatively insulates and does not interfere with the removal of moisture. As in the previous example, the steam circulation is not disturbed, and the wall remains dry, so you can choose any plaster mixture.
How to maintain a natural moisture balance
But often, for one reason or another, the facade finish is arranged to bypass the basic rules, or, even worse, the insulation was made with polystyrene sheets (its vapor permeability is almost zero) without a ventilation gap. This leads to the accumulation of moisture in the thickness of the wall, which over time manifests itself in damp corners, the collection of condensate in the room - and these are the first precursors of the appearance of fungal mold.
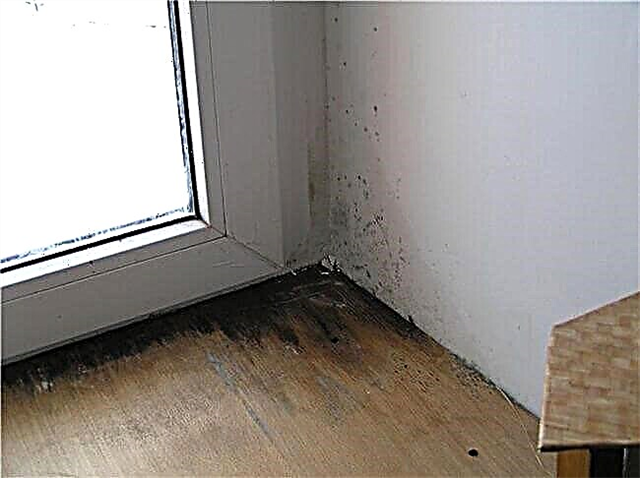 The consequence of violation of vapor permeability of aerated concrete walls
This serious flaw can be corrected only by using materials for interior decoration, whose ability to pass vapors is much lower than that of aerated concrete. This shielding method will prevent the accumulation of moisture inside the walls. Best used:
- hydrophobic impregnation,
- paints with a special composition,
- water resistant wallpaper,
- cement-sand plaster mortars of dense consistency.
But in this case, the importance of a high-quality ventilation device is greatly increased so that the accumulated moisture does not settle on the walls and indoors, creating a greenhouse effect.
In order not to complicate the construction process, it will be most correct to initially perform interior decoration. After all, the repair involves a large amount of evaporated moisture, which just needs to go outside, and best of all if he does it through the "bare" gas silicate walls.
And one more small nuance regarding the timing of the processing of walls from aerated concrete blocks. Any cellular materials give a good shrinkage, which, in turn, negatively affects any finishing cladding - this usually manifests itself in cracking and peeling of the decorative layer.
Therefore, it is recommended that both internal and facade finishing processes be carried out at least six months after the complete erection of the building’s box and roof device. It is best to plan this phase of construction for the spring - summer period. As mentioned above - first the interior decoration is carried out, after the end of all processes, in a month you can start processing the facade.
Which plaster to choose for interior decoration
As already noted above, aerated concrete blocks are characterized by a high degree of water absorption, which can lead to excessive drying of the applied layer of plaster. This is especially evident on gypsum compositions and cement-based mortars - quick drying, cracking and shedding. If you go from the opposite, and unnecessarily saturate the wall with water, then it simply will not be possible to plaster, since the applied layer will not be held on an aerated concrete basis.
The choice of the right materials will help to solve this problem:
- deep penetration primers with a special composition. Applying them, the main thing is not to overdo it or oversaturated the surface of the wall with moisture. Therefore, before use, read the instructions and follow them strictly
- special mixtures intended for plastering precisely gas silicate blocks. Their composition perfectly protects such "capricious" porous surfaces. But this is subject to dilution of the plaster in the correct proportions with water. Not to be mistaken in this matter will only help following the instructions for use from the manufacturer.
But that is not all. The cellular surface does not have good adhesive properties. For this reason, initially you need to apply a rough coat of plaster with a thickness of at least 5 mm. But even this finish is subject to cracking and peeling. To prevent this, plaster mesh is used. It is best to give preference to fiberglass or polyurethane fabric, due to their excellent resistance to alkaline environment and long service life.Only after applying such a reinforced plaster layer and its complete drying can we safely proceed to the final finish.
The best plaster mixes
Having a little understanding of what parameters the finishing mix should meet, let's look at its most popular and effective types:
- plaster compositions based on silicates, namely “water glass”. They combine perfectly with aerated concrete surface, especially in terms of vapor permeability. But there is a small "but." Such stucco mixtures are incompatible with many types of finishing, for example, based on acrylic, latex, silicone,
- gypsum plasters with perlite sand. They are ideal for aerated concrete wall surfaces, as indicated on the package. Any finishing material is suitable for them,
- cement-lime-based plaster mixes with the addition of optimizing additives. Such compositions are invented specifically for finishing cellular material, even without a preliminary primer. Internal stucco walls made of aerated concrete of a similar plan have not only excellent adhesion properties, but also apply to both rough and finish finishes.
The use of such plaster compositions is ideal for gas silicate walls and, if desired, they can be used to apply a leveling layer. Like all specialized materials, improved for use in one area, such mixtures have a very high cost, which ultimately adds up to a decent amount.
But there is an alternative that will allow to economically resolve the issue of internal plastering - the use of a conventional cement-sand mortar in a ratio of 1: 5. But use it in relation to aerated concrete surfaces must be extremely careful and not overdo it with the addition of water to the working mixture.
Preparing for plastering
The algorithm of the process for preparing walls for plastering is quite simple in execution, in which it is impossible to make a mistake. Therefore, you can do it yourself. This will require:
- fiberglass or plastic stucco mesh 100-120 cm wide,
- adhesive for ceramic tiles,
- deep penetration soil
- gear spatula with teeth 5-6 mm.
Stage 1. Carefully inspect the walls for building “jambs”. For example, cracks and chips are to be putty with alignment to the general level of the walls. For these purposes, an ordinary repair solution is suitable, however, if it is not required so much, it is best to use an adhesive specifically designed for aerated concrete.
Stage 2. After the restored parts have dried, go with a stiff brush on all walls to remove dirt and dust.

Step 3. Apply a primer in one coat. This can be done in a way convenient for you, for example, using a roller or brush. To reduce the consumption of the primer, experienced builders will use conventional sprayers. If there are none at hand, then you can just as well use the old model of a vacuum cleaner, the principle of which is to blow air. Only after high-quality drying of the first layer, you can start applying the second one.
Stage 4. When the primer is completely dry, you can safely spread the glue according to the instructions and cut the plaster mesh into strips, the length of which should be equal to the height of the walls.
Step 5. Starting from the bottom, throw the prepared glue on the wall gradually moving up. The thickness should be approximately equal to a layer of 5 mm, and the width is slightly larger than the width of the mesh.

Step 6. Attach a strip of plaster and press so that it lays securely on the wall. Now it is possible to level the adhesive layer with a notched trowel so that the direction of the grooves runs horizontally. This improves adhesion to both the wall and future plaster.
Plastering
After the reinforced layer is completely dry, you can safely proceed to the main plastering process.
Stage 1. Working at the building level, profiles are set - beacons.
Step 2. Mix the working solution according to the instructions. If the choice fell on a traditional cement-sand composition, then it is taken in a ratio of 1: 5, a plasticizer is added and kneaded to a thick consistency.
 Beacon alignment
Stage 3. Between two beacons a solution is poured over the entire height of the wall. Using the rule, the resulting layer is leveled to the desired level of smoothness. Attach the rule to the wall again and check to see if there are gaps between them. If there is, add the mortar and smooth, no - fine, plaster all the walls in a similar way.
The described plaster technology is quite simple and even an inexperienced master can successfully use it. The main thing is to correctly choose what to plaster aerated concrete walls inside the house.